
cheqd News
Introducing cheqd’s cheqd Studio, a new Software-as-a-Service offering
We’re making it easier and faster to build Digital Credential apps by offering a new Credentials SaaS API service. Co-authored by Ross Power (Product Manager),

We’re making it easier and faster to build Digital Credential apps by offering a new Credentials SaaS API service. Co-authored by Ross Power (Product Manager),

In the age of Web3, where decentralised decision-making, mass participation and “memeable” ideas can enable a project to thrive, community-first approaches are vital for Web3

cheqd becomes one of the first Decentralised Identity networks to enable Zero Knowledge Credentials, ‘ZKCreds’, also known as AnonCreds. Leveraging the renowned and widely used
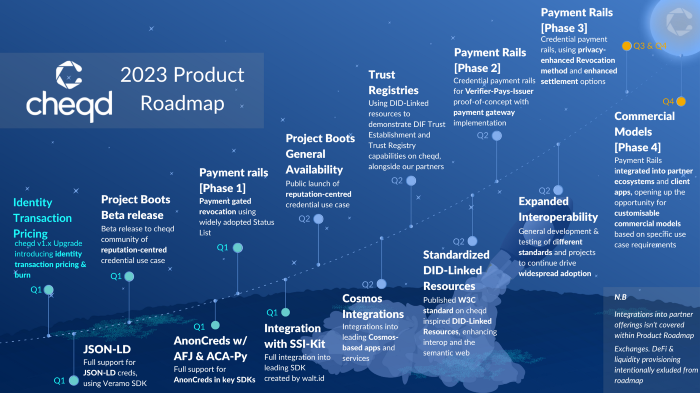
Setting the vision for the year ahead for delivering on cheqd network’s unique differentiators in decentralised identity Co-authored by Ankur Banerjee (CTO/co-founder), Ross Power (Product

The foundations are set for cheqd’s first-of-a-kind decentralised identity payment rails Co-authored by Ross Power (Product Manager), Alex Tweeddale (Product Manager & Governance Lead) and Ankur Banerjee (CTO/co-founder). Making cheqd the most

Launching the Veramo SDK for cheqd, enabling our partners to create and manage Decentralised Identifiers, Verifiable Credentials and Verifiable Presentations on cheqd Co-authored by Ross Power (Product